Sludge and the Audi / VW 1.8 L Turbo Engine
Audi A4 1.8 L turbo (B6)
Although
this A4 is still within the 4yr/50000 mile warranty,
Audi is calling it an abused vehicle
because the previous
owner went 500 miles over their prescribed oil change limit and is
therefore refusing to honor any warranty claims whatsoever
regardless of any relation to sludge. This includes reneging on the included 40K service work.
They weasel out of the warranty even though they erred by specifying 10,000+ mile oil changes with mineral oil, a small oil filter and low oil capacity in a hot turbo charged engine.
Contents:
Diagnosis: So You Think You Have Sludge
Treatment: Removing Sludge From the Audi 1.8T
- The Audi Sludge Letter
- The Audi Sludge TSB
- Valve Cover and Head Cleaning
- Oil Pan, Pump, and Suction Screen
- Crankcase Ventilation and Other Engine Peripherals
Recovery: Post Sludge Precautions
- Frequent Oil Screening
- Oil Filter Autopsy Mahle
- 2nd Autopsy Bosch
- 3rd Autopsy Audi
Other Documentation
It's been years since I wrote this. The vehicle is doing fine and the oil
pressure is still good, so they are salvageable. I feel confident in saying that
you must do a procedure similar to this to de-sludge a turbo charged engine with
hard, tarry carbon deposits. It may be different for other engines with sludge
gelling, but solvents used in a running 1.8L turbo will either have no effect,
or if strong enough will ruin the seals requiring even more work. Even if you
managed to dislodge some of the carbon it would end up clogging the oil pump
suction screen. It is replacing the oil pump pickup tube that makes this job so
difficult for the do-it-yourselfer because that requires supporting the engine
and lowering the subframe in order to remove the oil pan. If your pressure has
truly lowered to blinking engine light levels it is well past saving with some
sort of engine flush. It takes a lot of sludge covering the screen to lower the
pressure that much.
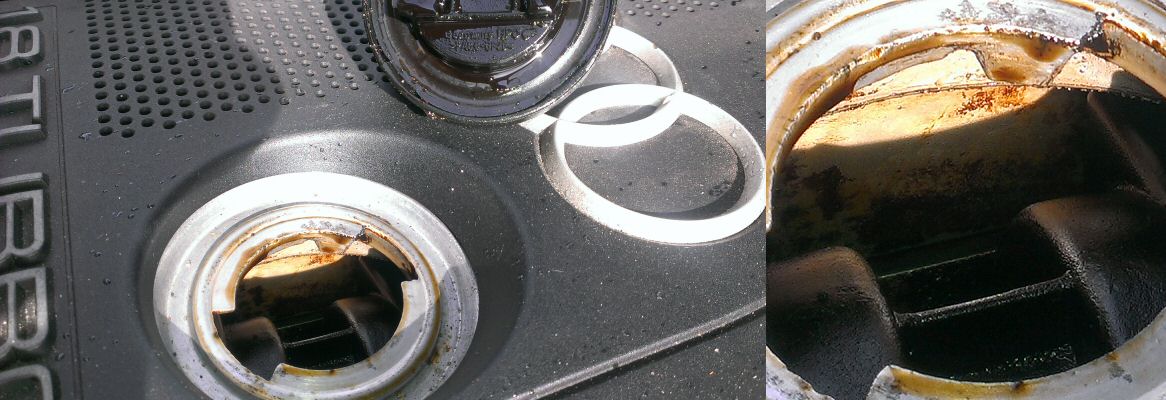
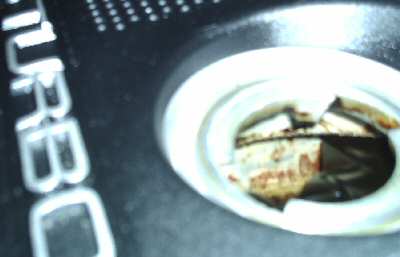
The test for sludge is very simple. Remove your oil filler cap and look
inside. It shouldn't be all black inside. Your main view is of the plastic
oil diverters over the camshaft bearing caps. Those are black. Most everything
else is silvery metal, though your view is very limited. It's all right
if there is a semi-transparent varnish coating. If you can scrape off a
thick, tar-like substance with your fingernail you have a problem.
There's no need to post a before shot because it would be all black.
If you doubt that take a look at my valve cover
as it was.
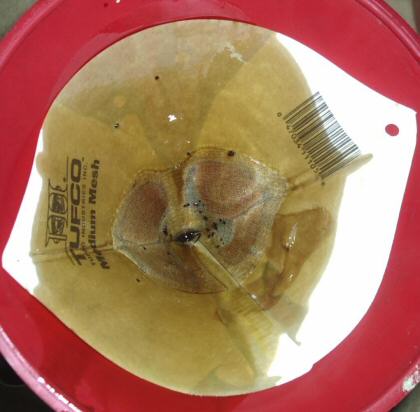
Another simple test is to put your drained
oil through a paint filter and check for carbon particles.
One obvious place to connect the oil gauge sender is at the location of
the stock warning sender. I wanted to leave the warning light intact so
I installed my gauge in place of the plug marked in red in this diagram
from the Bentley manual that I modified.
I can't be sure that this is the best site, but it showed me when my
pressure was low and it shows my pressure within the proper range since
the sludge repairs. It is also at least as accessible as any other spot.
I moved the radiator overflow tank aside to get what was at best limited
access.
I went with a cheap mechanical gauge with nylon tubing, thinking that
I could upgrade later if necessary. The mechanical gauges are said to be more
accurate and to have quicker response than the electrical senders. I figured there was no reason to look
for copper line based on the warnings I had heard about vibrations eventually
cracking it. I already had 6' of 5/8" i.d. windshield washer hose around
the house so I stuffed the nylon hose in that. It kinked a little when
I tried to push too much at once. Pushing in no more than 3/4" at a time
worked well. Once it was in the rubber hose it behaved well during the
install.
To gain access for the install I removed the plastic engine cover, the
weather stripping that holds the long plastic cover over the rear of the
engine bay, and I pushed the coolant reservoir out of the way. Only one
screw has to be removed to move the reservoir, but the plastic prongs, which go into the
metal tabs on the firewall, were hard to work free (pulled up on the reservoir and towards
the front of the car).
I used ratchet extensions and a swivel to get the plug out and put in
the sender. Then I used a small crescent wrench to fasten the hose with
its compression fitting. After dropping wrenches and having to fish them
out of the belly pan it finally dawned on me that I could tie a string
to the wrench.
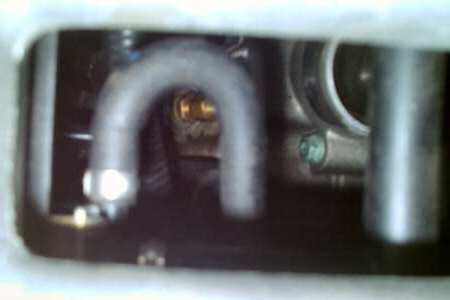
This is viewed from above from the driver's side looking through the intake
manifold. There is nothing enjoyable about manipulating parts and tools
down there. You should start this part of the installation first. If you
give up there's no sense in having a gauge installed in the cockpit. You
can see the brass pipe fitting that screws into the oil filter housing
and the brass compression fitting nut that secures the white nylon hose
(which is just barely visible before being blocked by the U-shaped hose
in front).
I wish I had known that the sender had a tapered pipe thread. It would
have spared me from an unnecessary trip to the auto parts store thinking
it had either defective or incompatible threads. It didn't take much tightening
to make it leak proof and I don't think you'd want to over do it as the
filter housing looks like it's made of aluminum.
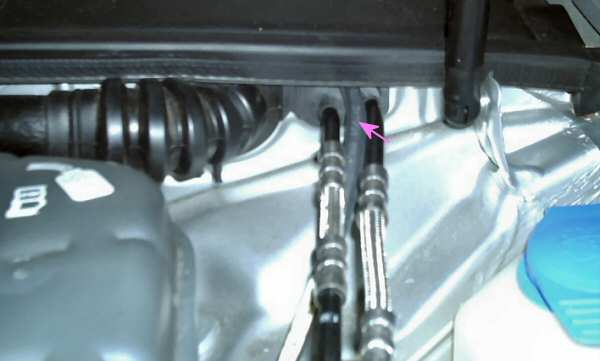
There are two firewalls. On the engine side I peeled back the weather
stripping and ran the hose above an oblong grommet for two metal lines.
The hose is marked in the image below. It then runs to the left from there
between the two firewalls.
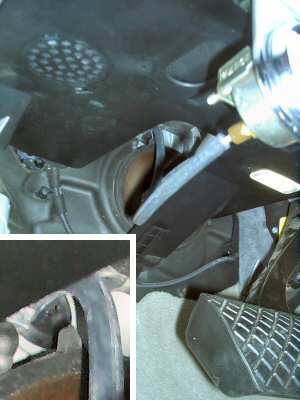
On the inside I cut a hole through an unused round grommet shown close
up in the inset of the photo. I mounted the gauge on the black plastic. I used the full
6' of hose. The gauge is partially blocked from view when I am driving
so that I can't read the number at the top of the dial. I can still see
the needle though. There is a chance of breaking the line when getting
in and out of the car. That would cause a lot of oil to spill if the engine
were running. (At over 20 psi I'm guessing it would be like a super soaker
water gun). I plan to secure a larger piece of hose with electrical tape
to cover the transition between the coupling nut and the rubber hose. Another
location for the gauge Also, some like to remove the center vents
and install there.
Bentley CD says: Readings I got on the first test drive: At the time I wrote: It wasn't long before the pressure dropped again: 1300 miles since the oil change and now my pressure won't get
above 30 psi (2 bar). Finally, the oil warning light came on when the pressure was about 20 psi
and below while driving. Since this car has valve tappets, which require
a minimum pressure (else they begin to make a loud racket), the warning
pressure threshold is higher than other cars which may not warn until the
pressure drops to about 6 psi. I never reached the point where the tappets
clattered.
Admitting you have a problem (They won't want to) I will finish this section when I have finished dealing with them. Until then you can always search the Audifans archives or Google alt.autos.audi.
Well it's been years without adding to this section. Long story short: At first I was getting my
oil changes and any other work as covered by the standard warranty and they said I had an oil problem.
When they finally said the vehicle had sludge, they also said the vehicle had been neglected by the previous
owner who had it for it's first two years (for going a bit over 12k miles on the second oil change instead of the prescribed 10k+—the
vehicle had been in for repairs at 19k miles, but that was too soon to be done under the warranty).
Therefore they said the warranty was no longer valid (even for
anything as unrelated as a radio malfunction or whatever else would normally be covered).
The Audi sludge letter extended the warranty for sludge problems to 8 years, unlimited mileage, if records verified that oil
changes occurred at the recommended intervals. The recommendation was originally for 10,000 mile oil changes with regular oil.
In 2004 that changed to a prescribed list of synthetic oils and a much larger filter: It's basically a list of items to inspect and replace, some warnings about
not using solvents within the engine, and how to determine if the engine is salvageable. According to the TSB the state of the camshaft bearings is the test
to determine if the engine should be salvaged. Apparently this is because
these bearings are at the end of the pressurized oil flow path. So, it
is assumed that if they are acceptable the rest of the engine is likely
to be as well.
It was easy to tell from the sludge around the bolts that my dealer
removed only one bearing cap before telling me that my engine was salvageable.
Having performed an oil filter analysis
after following the TSB's cleanup procedure, I feel the TSB cuts a big
corner when specifying that the head should be scraped in place. To do
it right the head should probably be pulled and soaked in solvent as
shown on this Toyota engine.
There is bound to be sludge left in corners and other hard to reach areas after scraping
the head. Hopefully with frequent oil changes, that shouldn't be a problem. The oil
gauge will let me know if the pick up screen is becoming clogged again. Look what I found. The Audi dealer wanted $3400 to perform the sludge TSB work or $300+
to replace the valve cover so that I could take it elsewhere. So I had
it towed home and began the work myself.
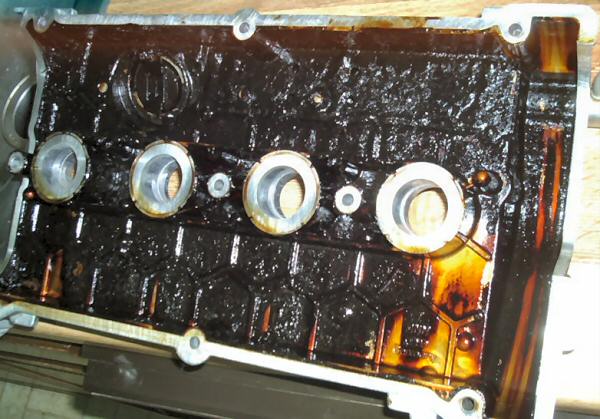
Well since the folks at Audi were kind enough
to remove the cover for me I started with it. This stuff is hard to remove.
I soaked this in various solvents, break parts cleaner, engine degreaser...
I still needed to brush it and it still had some varnish on it when I finished.
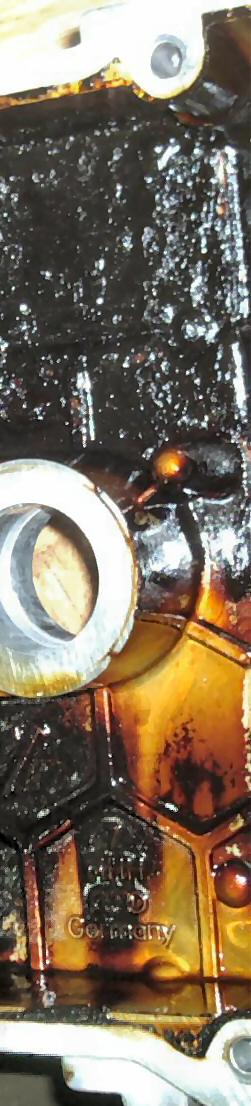
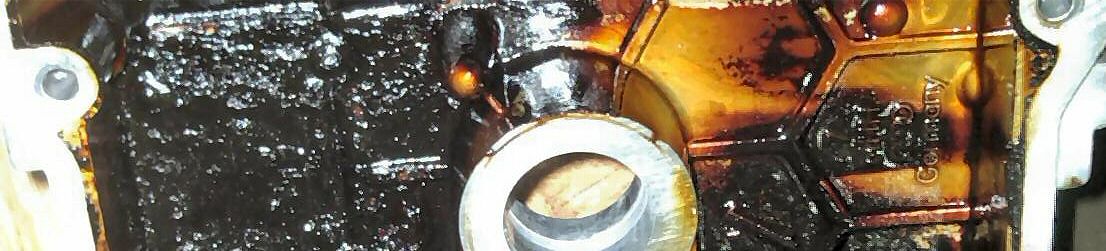
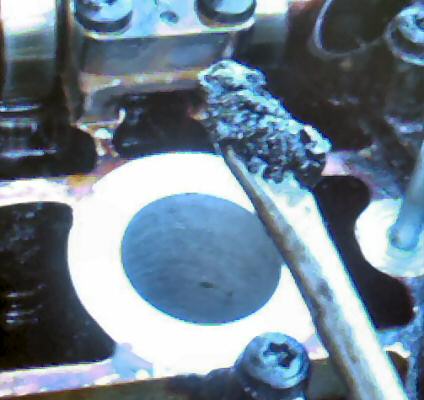
You could try soaking parts in carburetor cleaner overnight. On the areas not immersed in oil such as the valve cover the sludge was
hard and flaky or like undercoating. On dead spots filled with oil the
sludge was soft like that on the screwdriver above. Audi does not recommend
using engine flush chemicals and based on my efforts I'd say they would
be useless on the hard stuff. I have also heard that they can cause oil
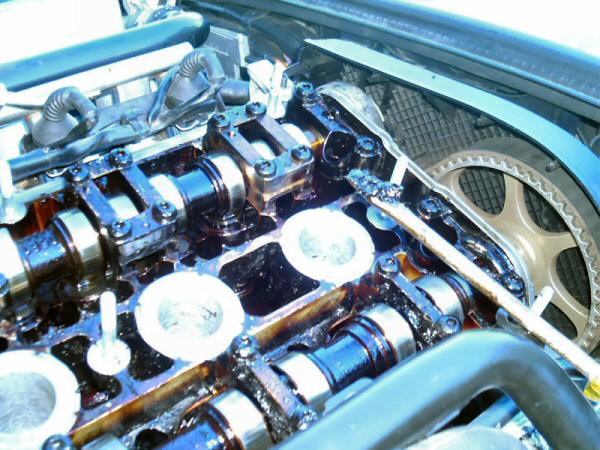
seal leaks. This is part way into the cleaning. One of the double camshaft bearings
has been removed and cleaned. The wall connecting the spark plug wells
has been scraped, though some brownish varnish remains. The Audi sealants prescribed by the Bentley manual are exorbitantly
expensive: about $70 for one at my dealer that I assumed must be for a vat of
the stuff for the pros, but no, it was for something smaller than a toothpaste
tube. It calls for sealant AMV-174-004-01
for the corners of the valve cover, AMV 188 001 02
for sealing the end bearing caps (probably anaerobic sealant typically called
for in Haynes manuals and that auto parts store employees scratch their heads
on), and silicone sealant D-176-404-A2
to make the oil pan gasket (there is no preformed gasket).
I used Permatex Blue RTV sealant and sprang for the Ultra
at $4.44 and I haven't had any oil leaks. I did have an oil leak after this
repair where I
couldn't find the source. This stopped when I replaced a bleeder
valve that had become clogged which was probably pressurizing the crankcase
(not sure if that would be the correct term/location) and blowing oil past a
seal.
For step by step
directions on valve cover removal and some views of a healthy 1.8T see the
tech article at www.audiworld.com Try this at your own risk.
I'm not taking responsibility for dropped engines or worse. I dusted off
an old structural engineering book for architects and made some calculations
that were enough to convince me.
This does not attempt to explain
all the details involved in removing the oil pan. It is only to
show those special considerations for the amateur mechanic. I strongly
recommend getting the Bentley Manual CD. It has the proper torque specs
and tightening sequences as well instructions for lowering the subframe
without messing up the alignment.
To remove the pan the subframe must be lowered (actually tipped down
in the front; the back is still secure). The subframe supports the engine.
Once that is lowered the only thing supporting the engine is the transmission,
so the engine has to be supported while removing the pan.
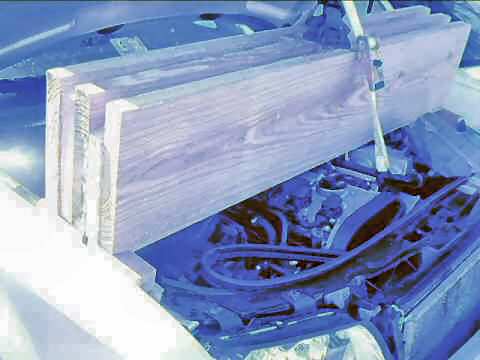
Who has an engine hoist?
I didn't and I wasn't about to buy one. I decided that I would be safe
with 3, 2x10s and tie-down straps with a 1000 lb. working load rating and
3000 lb. breaking point. I mistakenly purchased 2x12s which turned out
to be a good thing because the length of the strap below the ratchet is
fixed and rather long for this application. This thing is heavy. I used
some scrap pieces on the ends and center to connect the three beams. I
could barely set it in position by myself. I have since decided that with
the 2x12s I could remove one of the outer boards.
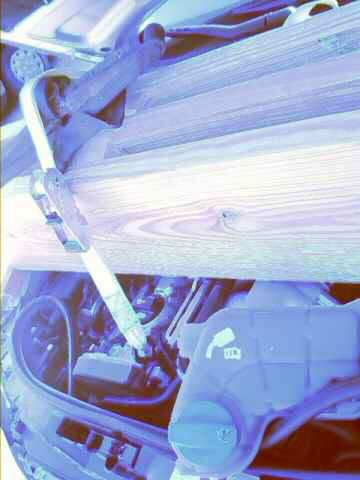
The Bentley manual doesn't make clear the location of the rear engine
eyelet for lifting. It is a black metal plate with the hole hidden by a
plastic sleeve that supports a hose. Pull that off to attach the hoist.
Note the 2x2s used on the inner edges of the fenders. I notched the
beams slightly (too much and the beams would have touched engine parts)
with a circular saw to fit over these. I may have placed cardboard under
the 2x2s.
Note the weather stripping peeled back and the coolant reservoir tank
still connected, but placed aside. I used a scissors jack with a piece
of radiator hose on top. I also added a second tie-down (not shown) for
peace of mind.
The manual says that the lock carrier must be placed in the service
position. I didn't do this. (I didn't really know all that implied when
I started the project. I eventually learned about that to do the timing belt
and stored the front end of the Audi in my living room.)
There might have been more room to remove the
oil pan if I had. Beyond that the only reason I can see to do so is to
easily reinstall the snub mount at the front of the engine. Perhaps this
is different on a car with a manual transmission, but with my automatic
snub mount I was able to push on the base to compress the rubber sufficiently
so that the bolts could be reinserted.
Place tension on the engine. Stop before it begins to lift.
There's a special tool to remove the two pan bolts at the end of the
transmission (#T10058). The flywheel has a notch in it to gain access to
the bolts. I managed to remove them with an Allen head socket placed lightly
(not snapped in) on a swivel extension. It would be easy to round out the
bolt this way. I noticed that most bolts break free and then turn rather
easily. A bolt that feels like it's turning slowly under a lot of force
is probably being stripped.
Don't mar the mating surfaces of the pan when trying to remove it. You
can tap it lightly with a rubber mallet. It won't seem like anything is
happening and then it will break free.
To remove the oil pump the sprocket must be removed. You'll need a large Torx (star bit). My basic drill set didn't have one large enough. I think
the size needed is a T40.
I probably needed only a new suction tube, but this job is so time consuming
that it seemed pointless not to spend $100 for a new pump. I thought I
was going to get a knock off, but the pump had Audi/VW and the proper part
number on it. The problem was that it came with a much longer spout than
the original shown below. I think it must have been intended for use in
the transverse VW engine, a design that allows for a larger pan (and more oil, I've
heard this may be why the VW with the same engine has fewer sludge problems). So I
had to bite my lip and buy a spout from the dealer.
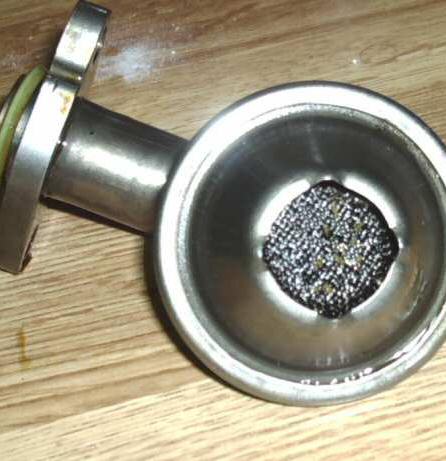
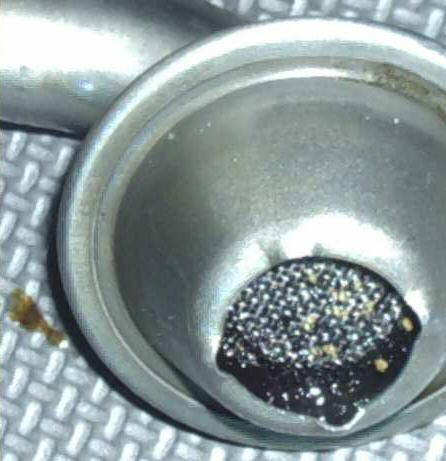
The yellowish bits are fragments of the oil-stained, white RTV sealant
used on the pan when the dealer replaced the pump at 24,000 miles. The
majority of the blockage was due to the hard carbon bits as well as some
softer sludge. Since it is black it's hard to see in the photo, but most
of the screen's openings had some piece jammed in and the tapered edges
were packed with sludge. All my attempts to clean this part by soaking in solvents
and Drain-o and by spraying solvent with an extender placed right at the
back of the screen were futile.
For my car the TSB says to replace the parts circled in the diagram.
According to the dealer technician you should definitely replace the items in red. The one on the left
is listed in the ETKA as a bleeder valve (#06B103245, good price here
and here). The mechanic at
the Audi dealer referred to it as the PCV valve. My Audi has a 3-way valve (some
are straight so check your part no.; might be 035103245A
...or G?). I posted my
story about this part along with the error codes caused by it to AudiFans.
Piston blow by pressure has to be relieved by the bleeder valve. If it clogs
the pressure will escape through oil seals causing leaks. "Flow is normally from both 2 & 13 toward 5, then 6, then out into the intake manifold.
Under boost, flow is from 2, past 5, to 13, then on through 15, where it enters the intake
system pre-turbo. Part 6 (The PCV Valve) is also a check valve that keeps boost air from entering
the PCV system."1
The other part (circled at right) is the vacuum suction jet pump (or brake booster suction jet pump, #058133753B, best
price I found).
I finally got around to checking this part and found that it was perfectly clean
inside. (It actually broke apart at the seam when I was trying to remove the
hoses) There are alternate arrangements to that pictured above depending on VIN# (AMB up to ...8E*3*100001)
where this part is connected with a hose directly to the PCV. That may be the
case where clogging of this part would occur.
If you try to clean the tubes and hoses be aware that the metal tubes
are painted black inside, so use some care in selecting solvents or other
cleaning agents.
After the repairs the oil pressure looks good. I aim to keep it that way.
Scraping the head as the Audi Sludge TSB states is not ideal. You can't
get in every nook and cranny and scraping will dislodge the sludge, inevitably
leaving some particles behind. These will move to the oil pan. The passages
from the head down to the oil pan are large and unlikely to clog. The next
item to clog is the suction
pickup screen for the oil pump. when that happens oil pressure is lost,
which is the first critical problem caused by sludge.
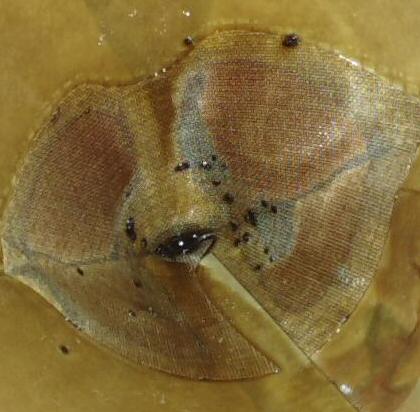
I couldn't bring myself to change $25 in M1 0W-40 oil every few hundred
miles so I bought a pack of paint filters to strain my drained oil so that
I could reuse it.
Here is what I got 1200 miles since the desludging and 900 miles since
the previous straining:
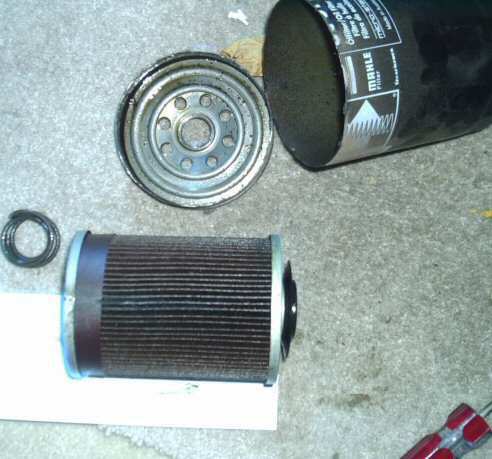
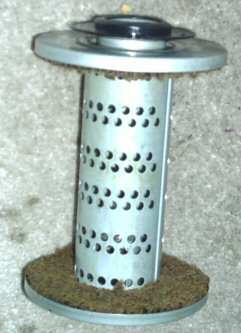
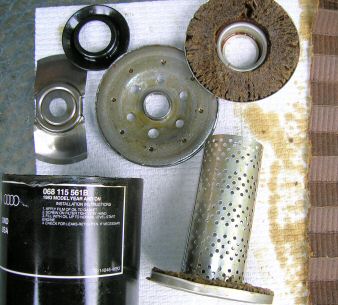
Here are the innards of the Mahle filter (#068115561) I just took off
my A4 1.8T at 43,000 miles, 1400 miles since cleaning the sludge
following the procedure in the Audi Sludge TSB. This was the first filter used since
cleaning the engine. Though, if I remember correctly, I ran the engine
after the repair and then replaced the old filter with this one.
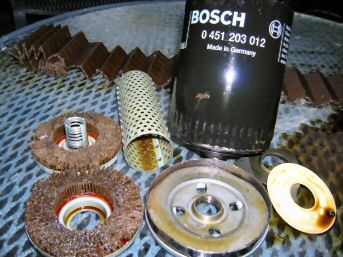
Filter parts:
Not much to it. A spring holds the core and gasket against the open
end. The gasket seals the incoming oil from the flow out the center and
keeps oil from draining back into the pan when the engine is stopped so that it
doesn't need to be filled before the engine gets any oil the next time you start
it (not an issue on the A4 as the end of the filter is mounted upward). There
is a spring-loaded gasket at the other end that will allow oil to bypass
clogged paper if the pressure differential within the filter gets too high.
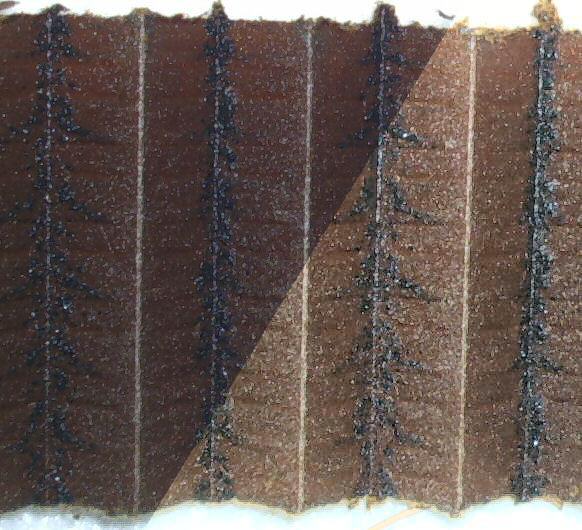
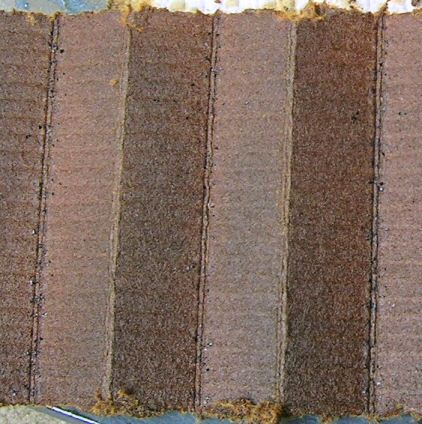
The filter paper stretched out:
I feel the TSB cuts corners, to do it right the head
should probably be pulled and soaked in solvent instead of scraped
by hand in place.
Hopefully, next time this won't be so bad. It actually doesn't seem
that bad now considering the amount of crud
I removed from the head.
People make a lot of fuss over filters. Obviously you want something
of sufficient quality that the seals, gaskets and paper work as intended,
but none of that should be hard for stuff as simple as that. The main difference
I can see is that larger is better (though there is no reason to oversize
given a specified change interval and engine). This filter probably has
at least twice the surface area of the originally specified filter. That
means the same paper should be able to hold twice as many impurities before
clogging.
The only other factor is the type of paper. Some are paper (cellulose)
and some are synthetic. Paper choice will determine the largest sized particles
that are allowed to pass through to the bearings. There are some drawbacks
to blocking small particles. The paper will clog sooner. If that happens
before it is changed then oil will bypass the paper altogether allowing
even the large particles to reach the bearings. It would also be interesting
to know if thick, cold oil bypasses the paper to some extent and whether
this would occur even more so with a paper of a finer mesh.
(part# 72174) After another 1000 miles it looks better: less carbon.
After another 1700 miles even better (par# 068-115-561B).
The Audi and the Mahle have similar paper. The Bosch and Audi use a
leaf spring instead of a coil spring. The others use a metal strip to join
the two ends of the paper together while the Audi is glued.
Here is another analysis with information from those with some experience.
Quoting from that page:
Oil Filter Media Condition Non-turbocharged: Tan colored, small amounts of hard carbon.
Filter paper should not be brittle. Dark filter media without significant
hard carbon means the filter has not been changed often enough. Dark filter
media with significant amounts of hard carbon indicate high oil temperatures.
Suspect compression blow-by, or poor engine baffle.
Turbocharged: Tan to dark colored with more amounts of hard carbon.
If filter media is brittle then filter should be changed more often or
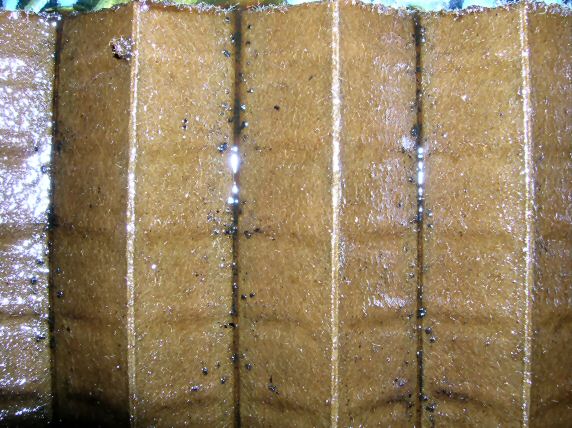
oil temperatures should be reduced. Just to be pointlessly nerdy here's a view through my microscope of the oil filter paper from one of these filters.
A good hour long YouTube video from Edge Motors on cleaning up sludge in the 1.8L Turbo. They do some things differently than I did following the Bentley manual.
Notably you don't have to remove the subframe completely like they do. From
what I understand there may be issues with wheel alignment after removing
the subframe. However, with the subframe only lowered it is very difficult
to get the oil pan back in without messing up your freshly applied,
time-sensitive gasket goo. Think lots more obscenities yelled, hope the
neighbors have their kids out of earshot... While the problems with the A4 were glaring (any turbo charged engine
should not be prescribed more than 10,000 miles on regular oil with a small
filter further reducing oil capacity/buffering), any manufacturer may have their issues.
This is a Toyota
with gobs of sludge at only 8,700 miles! Chapter One - Motor Oil 101: (from a guy who seems to know a lot of science on oil)
alt.autos.volvo:
Turbo Sludge 2001 V70 T5
rec.autos.makers.chrysler:
VW now requires Synthetic Oils for the Turbo 1.8 liter 4 cylinder engine
alt.autos.audi
10k between oil changes!?
alt.autos.audi
Oil light coming on occasionally with hard use: A4 B6
Nine years later the car now has 110,000 miles on it and has gone 70k since the sludge cleanup. I've been doing
5,000 mile oil changes using Mobile 1 0W40. Still looks as good as when it was first cleaned
as shown at the beginning of this article. Diagnosis: So You Think You Have Sludge
Look Under The Oil Filler Cap
Installing
an Oil Pressure Gauge
Pressure Specs
19 psi @ idle
50-65 psi @ 2000 rpm20 psi @ idle
45 psi @ 2000 rpm, reaching close to 70 psi during hard acceleration.
I'm thinking the 45 is close enough. Anything to worry about?
— This car had its oil pump replaced at 25k miles and has had oil light
warnings since. I'm thinking that now with the proper oil, filter and interval
specs the sludge problem has been reduced to one where the sludge is gradually
being cleaned up and is clogging the filter. The dealer has my next oil
change interval at 2000 miles.
My Dealings with My Audi Dealer
Treatment: Removing Sludge From the Audi 1.8T Engine
The Audi Sludge Letter
A4 Turbo Engine Warranty Extension.htm
forums.audiworld
The Audi Sludge TSB from August 2004 (Technical Service Bulletin)
The Audi Sludge TSB is on pdf-archive.com: TSB-Audi-Oil-Sludge-Repair That is on one of those
annoying download sites that open up multiple ad pages, but the file is there. You can try the direct link,
tsb-audi-oil-sludge-repair.pdf (66kb) If it goes missing search for Technical Bulletin C17-04-03 (Group:17 Number:04-03). That is not included in my version of the Bentley Manual which only lists a single TB about the oil cooler hoses under group 17, Engine Lubrication. The word sludge
does not appear until the second page.

Valve Cover and Head Cleaning
Sealants
Oil Pan, Pump, and Suction Screen
 Now comes the hard part! Getting to the oil pump suction screen.
 The oil pan had
hard sludge that got worse higher up on the walls of the pan. I got it
spotless using a steel wire brush wheel on a rotary tool. I tried a softer
brass brush initially, but it disintegrated too quickly.
The oil pan had
hard sludge that got worse higher up on the walls of the pan. I got it
spotless using a steel wire brush wheel on a rotary tool. I tried a softer
brass brush initially, but it disintegrated too quickly.
Crankcase Ventilation and Other Engine Peripherals
Recovery: Post Sludge Precautions
Table of Oil Pressure Specifications for the Audi A4 (B6)
Engine speed
Bentley specs (psi)
Actual (psi)
idle (760) rpm
19
20
2000 rpm
50-65
57
80 mph
67
max cold
~100
max hot
~80
Frequent Oil Screening
Oil Filter Autopsy (Mahle)
 If someone would like to do this with a filter used for
5,000 - 10,000 miles on a clean 1.8T I'd love to see it. (email me)
If someone would like to do this with a filter used for
5,000 - 10,000 miles on a clean 1.8T I'd love to see it. (email me)
 I
cut it open using several of those cheap rotary tool cut-off wheels that
disintegrate. I've since used a standard hacksaw with a metal blade and
find it's just as fast (a few minutes) without going through all those cut-off wheels that
bust up and can fly off toward your eyes. Either way it's messy. I use the hacksaw to cut
out the paper filter as well.
I
cut it open using several of those cheap rotary tool cut-off wheels that
disintegrate. I've since used a standard hacksaw with a metal blade and
find it's just as fast (a few minutes) without going through all those cut-off wheels that
bust up and can fly off toward your eyes. Either way it's messy. I use the hacksaw to cut
out the paper filter as well.
2nd Oil Filter Autopsy (Bosch)
3nd Oil Filter Autopsy (Audi)

Other Documentation
My rants in groups along with the replies
http://groups.google.com/groups/search?enc_author=pJHwKhsAAACrudTb7eNCDhx6z3tDNJoZQfTdtGgJFvz7ruM_sZ_xXA&scoring=d&hl=en
Other words
And Finally